Linux’s default security is pretty good, and better than that of most of its competitors, but it still has weaknesses.
At EuroVPS, we know that the only good server is a secure server, and so we’ve pulled together our top tips for securing a Linux VPS server so that you can stop the hackers at the gates before they breach your site and gain access to sensitive data.
While thorough security testing is undoubtedly the best way to keep your server safe, we list some quicker actions you can opt for to step up your server´s protection right now. These techniques don’t need to take a huge amount of time and effort, but a certain level of administrative experience is required.
If you need any help then don’t be afraid to get in touch – we’ll be happy to help.
Let’s get started, here are 20 ways to keep your VPS secure.
1. Disable root logins
Want a secure VPS? Then you should never log in as the root user.
By default, every Linux VPS has “root” as a username, and so hackers try brute force attacks to crack the password and gain access. Disabling logins from the “root” username adds another layer of security, as it stops hackers from simply guessing your user credentials.
Instead of logging in as the root user, you’ll need to create another username and use the “sudo” command to execute root level commands.
Sudo is a special access right that can be given to authorized users so that they can run administrative commands, and it eliminates the need for root access.
Be sure to create your non-root user and to give it the appropriate levels of authorization before you disable the “root” account.
When you’re ready, go ahead by opening up /etc/ssh/sshd_config in nano or vi and finding the “PermitRootLogin” parameter.
By default, this will say “yes”.
Change it to “no” and save the changes.
2. Change the SSH port
It’s hard for people to hack SSH when they can’t find it. Changing the SSH port number can prevent malicious scripts from directly connecting to the default port (22).
To do this, you’ll need to open up /etc/ssh/sshd_config and to change the appropriate setting.
Be sure to double check whether the chosen port number is being used by any other services – you don’t want to create a clash!
3. Keep server software updated
It isn’t difficult to update your server’s software.
You can simply use the rpm/yum package manager (CentOS/RHEL) or apt-get (Ubuntu/ Debian) to upgrade to newer versions of installed software, modules, and components.
You can even configure the operating system to send yum package update notifications via email. This makes it easy to keep track of what’s changing. And, if you’re happy to automate the task, you can set up a cronjob to apply all available security updates on your behalf.
If you’re using a panel, such as Plesk or cPanel, then you’ll need to update that, too. Most panels can be set to update themselves automatically, and cPanel uses EasyApache for most package updates.
Finally, you’ll want to apply security patches as quickly as possible. The longer you wait, the more likely you are to succumb to a malicious attack.
4. Disable unused network ports
Open network ports and unused network services are easy targets for hackers, and you’ll want to protect yourself against exploitation.
Use the “netstat” command to see all currently open network ports and their associated services.
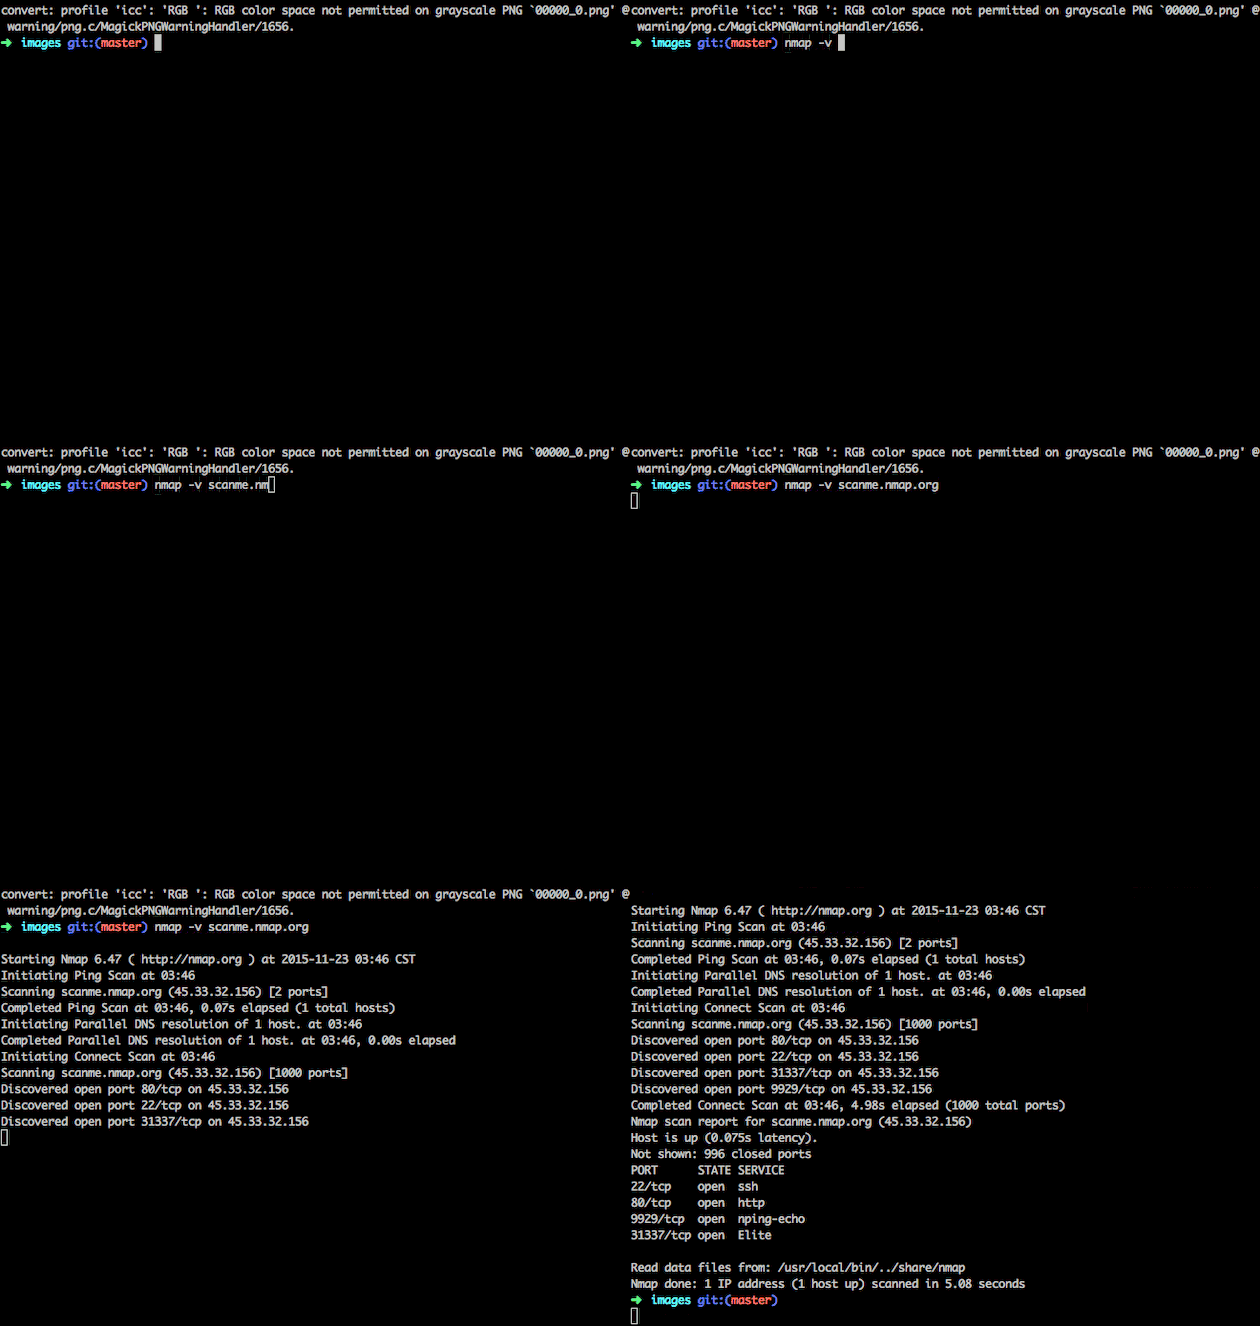
Consider setting up “iptables” to close all open ports or using the “chkconfig” command to disable unwanted services. And if you use a firewall like CSF, you can even automate the iptables rules.
5. Remove unwanted modules/packages
It’s unlikely that you’ll need all of the packages and services that came bundled with your Linux distribution. Every service that you remove is one less weakness to worry about, so make sure that you’re only running services that you’re actually using.

Not using a package? Just trash it!
On top of that, avoid installing unnecessary software, packages, and services to minimize potential threats. It has the welcome side-effect of streamlining your server’s performance, too!
6. Disable IPv6
IPv6 has several advantages over IPv4, but it’s unlikely that you’re using it – few people are.
Not using IPv6? Disable it!
But it is used by hackers, who often send malicious traffic via IPv6, and leaving the protocol open can expose you to potential exploits. To combat the problem, edit /etc/sysconfig/ network and update the settings so that they read NETWORKING_ IPV6=no and IPV6INIT=no.
7. Use GnuPG encryption
Hackers often target data while it’s in transit over a network. That’s why it’s vital to encrypt transmissions to your server using passwords, keys and certificates. One popular tool is GnuPG, a key-based authentication system that’s used to encrypt communications. It uses a “public key” that can only be decrypted by a “private key” that’s available only to the intended recipient.
8. Have a strong password policy
Weak passwords always have been – and always will be – one of the largest threats to security. Don’t allow user accounts to have empty password fields, or to use simple passwords like “123456”, “password”, “qwerty123” or “trustno1”.

You can boost security by requiring all passwords to mix lower and upper case, to avoid the use of dictionary words and to include numbers and symbols. Enable password aging to force users to change old passwords at regular intervals, and consider restricting the re-use of previous passwords.
Also use the “faillog” command to set a login failure limit and to lock user accounts after repeated failed attempts to protect your system from brute force attacks.
9. Configure a firewall
Simply put, you need a firewall if you want a truly secure VPS.
Luckily, there are plenty to choose from. NetFilter is a firewall that comes integrated with the Linux kernel, and you can configure it to filter out unwanted traffic. With the help of NetFilter and iptables, you can fight against distributed denial of service (DDos) attacks.
Setting up a firewall isn’t enough. Make sure it’s configured properly!
TCPWrapper is another useful application, a host-based access control list (ACL) system that’s used to filter network access for different programs. It offers host name verification, standardized logging and spoofing protection, all of which can help to beef up your security.
Other popular firewalls include CSF and APF, both of which offer plugins for popular panels like cPanel and Plesk.
10. Use disk partitioning
For added security, it’s a good idea to partition your disk to keep operating system files away from user files, tmp files and third-party programs. You can also disable SUID/SGID access (nosuid) and disable the execution of binaries (noexec) on the operating system partition.
Note: Want to learn more about the top security vulnerabilities you should be watching out for?
See below:
11. Make /boot read-only
On Linux servers, all kernel-specific files are stored inside the “/boot” directory.
But the default access level for the directory is “read-write”. To prevent unauthorized modification of the boot files – which are critical to the smooth running of your server – then it’s a good idea to change the access level to “read only”.
To do this, simply edit the /etc/fstab file and add LABEL=/boot /boot ext2 defaults, ro 1 2 to the bottom. And, if you need to make changes to the kernel in the future, you can simply revert back to “read-write” mode. Then you can make your changes and set it back to “read only” when you’ve finished.
12. Use SFTP, not FTP
File transfer protocol (FTP) is outdated and no longer safe, even when using “FTP over TLS” (FTPS) encrypted connections.
Both FTP and FTPS are still vulnerable to packet sniffing, when a computer program intercepts and logs the traffic that’s passing over your network. FTP is fully “in the clear” and FTPS file transfers are also “in the clear”, which means that only the credentials are encrypted.
SFTP is “FTP over SSH” (also known as “secure FTP”), and it fully encrypts all data – including both the credentials and the files that are being transferred. At EuroVPS, we only support SFTP.
13. Use a firewall
Your firewall is the gatekeeper that either allows or denies access to the server, and it’s your first line of defense against hackers.
Installing and configuring a firewall should be one of the first things that you do when setting up and securing a VPS or bare metal server. Consider consulting companies like Castra who provide threat security for additional protection.
Here at EuroVPS, all of our managed hosting plans include security hardening when your VPS or dedicated bare-metal server is first deployed.
14. Install antimalware/antivirus software
A firewall’s main job is to deny access to any sources of known malicious traffic, and it effectively acts as your first line of defense. But no firewall is fool-proof and harmful software can still slip through, which is why you need to protect yourself further.
Too many novice server admins fail to install anti-malware software, and that’s a mistake. The most common reason for this isn’t laziness – it’s actually because they don’t want to spend money on security software. To address this concern, you can start by trying some antivirus free trials and choose which one to install. A firewall alone isn’t always sufficient, and a layered approach to security is crucial.

As a rule, the paid solutions are usually the best, because their revenue stream allows them to hire talented programmers and researchers who can help the software to stay relevant.
But if budget is an option then it’s a good idea to look at some of the free alternatives.
ClamAV and Maldet are two open-source applications that can scan your server and score potential threats. That’s why we install both of them as part of the VPS security hardening process for our managed hosting customers.
15. Turn on CMS auto-updates
Hackers are constantly trying to locate security loopholes – especially in your website’s content management system (CMS). Popular CMS providers include Joomla, Drupal, HubSpot and WordPress, which powers nearly 20% of the web.
Most CMS developers regularly release security fixes, as well as new features.
Much more allow you to automatically update the CMS so that the fix is applied as soon as a new version is released. WordPress was late to the game with auto-updates, and if you’re running an older site then it might be disabled by default. Be sure to check the setting and to enable auto-updates where possible.
Remember that your website’s content is your responsibility, and not your host’s. It falls to you to ensure that it’s regularly updated, and it’s a good idea to take regular backups, too.
16. Enable cPHulk in WHM
As well as offering a firewall, cPanel also has “cPHulk” brute force protection.
Firewalls aren’t infallible, and “good” traffic that slips through can turn out to be bad. These false positives are due to the firewall’s settings, and tweaks might be needed to offer additional protection.
In the meantime, cPHulk acts like a secondary firewall, preventing brute-force attacks (from repeated attempts to guess the password) on the server.
We often find that cPHulk blocks the login ability first and that the firewall later catches up, banning the entire IP. To enable it, you’ll need to go to the WHM Security Center and select cPHulk Brute Force Protection. This is another step in the security hardening process that we use on our managed VPS and dedicated servers.
17. Prevent anonymous FTP uploads
cPanel and Plesk both disable anonymous FTP uploads by default but other setups can come with it pre-enabled.
Allowing anonymous users to upload via FTP is a massive security risk, because it allows anyone to upload anything they want to your web server. As you can imagine, it’s not recommended – it’s a bit like giving your keys to a burglar.
To disable anonymous uploads, edit your server’s FTP configuration settings.
18. Install a rootkit scanner
One of the most dangerous pieces of malware is the rootkit.
It exists at the operating system (OS) level, below other normal security software, and it can allow undetected access to a server. Luckily, you can use “chrootkit”, an open-source tool, to find out whether your server is infected. But rootkits aren’t always easy to remove, and the best way to fix the issue is often to reinstall the OS.
19. Take regular backups
Too many people forget to take regular backups – and then they regret it when something goes wrong and they don’t have a copy of their data. No matter how careful you are, and no matter how secure your server is, there’s always a chance that something could go wrong.
Don’t take unnecessary risks by failing to take backups, and don’t rely on your host to do it either. Taking backups of your own is recommended, even if your hosting provider says that they do it on your behalf. Store copies of it in different locations and consider using the cloud so that your backup can be accessed from anywhere.
At EuroVPS, we offer free managed backups for all customers – but we still recommend that customers store their own as an extra precaution. You can never have too many backups!
20. Use a strong password
We know, we know – we’ve already said this.
But a strong password policy is absolutely vital, and so it’s always worth repeating. Poor passwords are still the number one threat to security. And the same applies for when securing windows servers as well!
Password protocol is often misunderstood. Complexity is important, but so is length. While it’s a good idea to use a mixture of capital and lower case letters, numbers and special characters, you should also make it as long as is realistically possible.
Communicate this with your users, and take steps to secure your server at the admin level. cPanel and Plesk can both be configured to enforce strong password use, and they can also set passwords to expire automatically.
Conclusion
Vulnerabilities in web server infrastructure can be catastrophic. It’s like swimming in shark-infested water with a bleeding cut.
There are millions of hackers around the world, working around the clock to uncover even the slightest security weaknesses in your VPS. It’s crucial for you to secure your VPS against potential threats because sooner of the later, the hackers are coming to get you.
Corporate and e-commerce sites, in particular, are becoming prime targets for would-be hackers. Although most companies have basic security measures in place, they’re often ineffective and easily breached.
Our managed hosting services include security audits and hardening. We handle the safety of your server while you focus on what you do best.


